


1.Spring Boot 入门
1.1什么是 Spring Boot
Spring 诞生时是 Java 企业版(Java Enterprise Edition,JEE,也称 J2EE)的轻量级代替 品。无需开发重量级的 Enterprise JavaBean(EJB),Spring 为企业级 Java 开发提供了一种 相对简单的方法,通过依赖注入和面向切面编程,用简单的 Java 对象(Plain Old Java Object, POJO)实现了 EJB 的功能。
虽然 Spring 的组件代码是轻量级的,但它的配置却是重量级的。一开始,Spring 用 XML 配置,而且是很多 XML 配置。Spring 2.5 引入了基于注解的组件扫描,这消除了大量针对 应用程序自身组件的显式 XML 配置。Spring 3.0 引入了基于 Java 的配置,这是一种类型安 全的可重构配置方式,可以代替 XML。所有这些配置都代表了开发时的损耗。因为在思考 Spring 特性配置和解决业务问题之间需要进行思维切换,所以写配置挤占了写应用程序逻 辑的时间。和所有框架一样,Spring 实用,但与此同时它要求的回报也不少。
除此之外,项目的依赖管理也是件吃力不讨好的事情。决定项目里要用哪些库就已经够
让人头痛的了,你还要知道这些库的哪个版本和其他库不会有冲突,这难题实在太棘手。并且,依赖管理也是一种损耗,添加依赖不是写应用程序代码。一旦选错了依赖的版本,随之 而来的不兼容问题毫无疑问会是生产力杀手。
Spring Boot 让这一切成为了过去。
Spring Boot 是 Spring 社区较新的一个项目。该项目的目的是帮助开发者更容易的创建 基于 Spring 的应用程序和服务,让更多人的人更快的对 Spring 进行入门体验,为 Spring 生态系统提供了一种固定的、约定优于配置风格的框架。
Spring Boot 具有如下特性:
(1)为基于 Spring 的开发提供更快的入门体验
(2)开箱即用,没有代码生成,也无需 XML 配置。同时也可以修改默认值来满足特 定的需求。
(3)提供了一些大型项目中常见的非功能性特性,如嵌入式服务器、安全、指标,健 康检测、外部配置等。
(4)Spring Boot 并不是不对 Spring 功能上的增强,而是提供了一种快速使用 Spring 的方式。
1.2Spring Boot 入门小Demo
1.3起步依赖
创建 Maven 工程 springboot_demo(打包方式 jar)
在 pom.xml 中添加如下依赖
在这里面我继续父依赖,这那相关的依赖jar包都会传递进来,版本也做了统一
 <parent>
		<groupId>org.springframework.boot</groupId>
		<artifactId>spring-boot-starter-parent</artifactId>
		<version>1.4.1.RELEASE</version>
		<relativePath />
	</parent>
<dependencies>
		<dependency>
			<groupId>org.springframework.boot</groupId>
			<artifactId>spring-boot-starter-web</artifactId>
		</dependency>
</dependencies>
而这些 jar 包正式我们做开发时需要导入的 jar 包。因为这些 jar 包被我们刚才引入的 spring-boot-starter-web 所引用了,所以我们引用 spring-boot-starter-web 后会自动把依赖传 递过来。
其中就是因为这个jar包帮我们来集成了很多配置
1.4变更 JDK 版本
我们发现默认情况下工程的 JDK 版本是 1.6 ,而我们通常用使用 1.7 的版本,所以我们需要在 pom.xml 中添加以下配置
<properties>
		<java.version>1.7</java.version>
	</properties>
添加后更新工程,会发现版本已经变更为 1.7
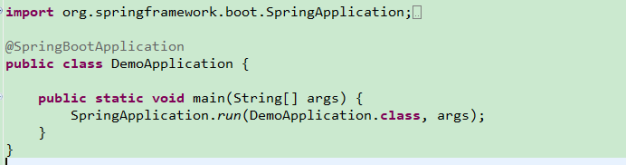
1.5引导类
只需要创建一个引导类 .其实也叫启动类
简单解释一下:
@SpringBootApplication 其实就是以下三个注解的总和
@Configuration: 用于定义一个配置类
@EnableAutoConfiguration :Spring Boot 会自动根据你 jar 包的依赖来自动配置项目。
@ComponentScan: 告诉 Spring 哪个 packages 的用注解标识的类 会被 spring 自动扫描并 且装入 bean 容器。
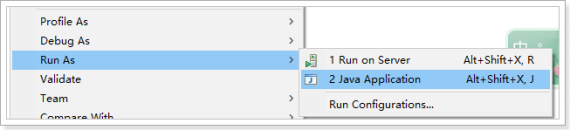
1.6启动
在Spring Boot项目中,启动的方式有两种,一种是直接run Java Application另外一种是通过Spring Boot的Maven插件运行。
第一种:
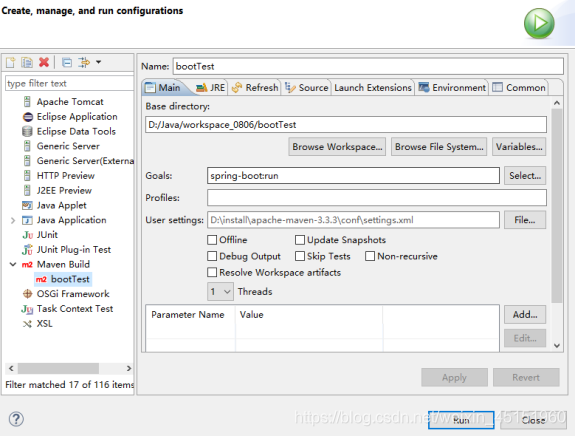
第二种:
添加Spring boot的插件
<plugin>
				<groupId>org.springframework.boot</groupId>
				<artifactId>spring-boot-maven-plugin</artifactId>
			</plugin>
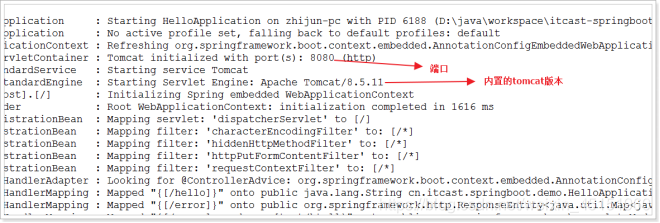
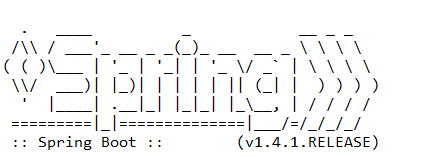
我们直接执行这个引导类,会发现控制台出现的这个标识

1.7热部署
我们在开发中反复修改类、页面等资源,每次修改后都是需要重新启动才生效,这样每
次启动都很麻烦,浪费了大量的时间,能不能在我修改代码后不重启就能生效呢?可以,在 pom.xml 中添加如下配置就可以实现这样的功能,我们称之为热部署。
<dependency>
			<groupId>org.springframework.boot</groupId>
			<artifactId>spring-boot-devtools</artifactId>
		</dependency>
也可以指定加载的位置:
spring.devtools.restart.enabled=true
spring.devtools.restart.additional-paths=src/main/resources
spring.devtools.restart.exclude=src/main/java
2.Spring MVC
2.1Spring MVC 实现 Hello World 输出
我们现在开始使用 spring MVC 框架,实现 json 数据的输出。如果按照我们原来的做法,需 要在 web.xml 中添加一个 DispatcherServlet 的配置,再添加一个 spring 的配置文件,配置文件中需要添加如下配置
但是我们用 SpringBoot,这一切都省了。我们直接写 Controller 类
@RestController是一个组合注解
@Controller
@ResponseBody 用与返回字符串或json数据
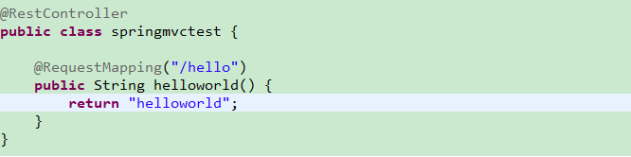
我们运行启动类来运行程序
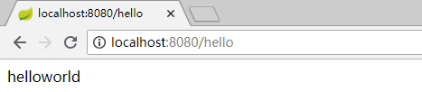
在浏览器地址栏输入 http://localhost:8080/hello 即可看到运行结果
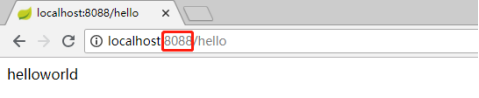
2.2application.properties配置文件
在 src/main/resources 下创建 application.properties 或者 更加简洁的application.yml文件
#修改 tomcat 启动端口

重新运行引导类。地址栏输入http://localhost:8088/hello
补充:
默认的加载路径是根路径,可以修改成自己的项目路径

2.3application.yml文件
yaml是一种直观的能够被计算机识别的数据序列化格式, 容易被人类阅读,yaml类似于xml,但语法更简洁;
它是一种冒号,空格,换行的数据格式,后缀可以是yml,也可以是yaml
如果两个application.properties和application.yml同时存在,优先加载application.properties

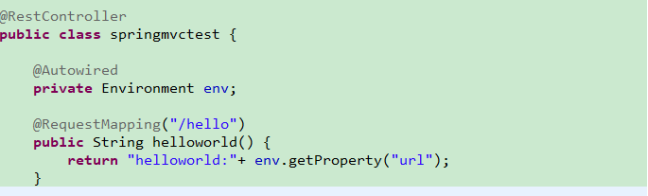
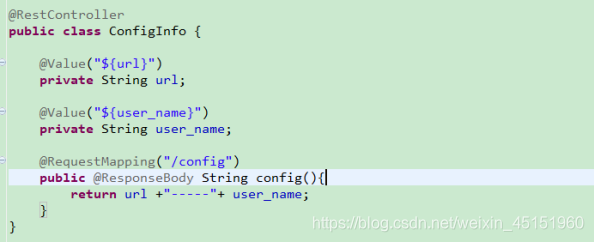
2.4读取自定义配置文件信息
在 src/main/resources 下的 application.properties 增加配置

我要在类中读取这个配置信息,修改 HelloWorldController
方式一:
方式二:
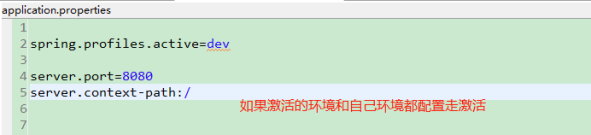
2.5多环境配置文件
今后我们在开发过程中有很多种开发环境那么可能就有很多个环境的配置文件。那么如何进行配置呢?
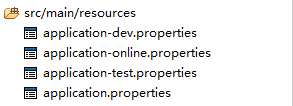

这里springboot默认加载application.properties文件,需要在默认文件中把其他的配置文件进行激活

测试

注意细节:
2.6自定义banner
启动Spring Boot项目后会看到这样的图案:
这个图片其实是可以自定义的:
-
打开网站:http://patorjk.com/software/taag/#p=display&h=3&v=3&f=Doom&t=yanqi%20-%20%3E%3E%3E
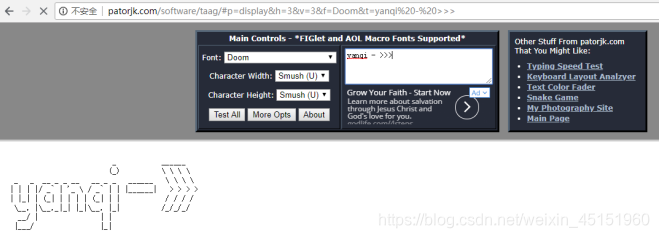
-
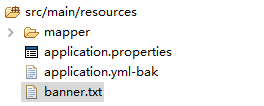
拷贝生成的字符到一个文本文件中,并且将该文件命名为banner.txt
-
将banner.txt拷贝到项目的resources目录中:
控制台看运行结果
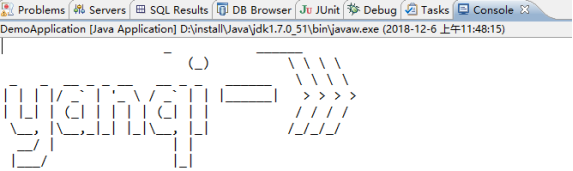
好像没有默认的好看啊!
2.7使用springboot访问jsp
2.7.1添加 jsp相关依赖
<!-- servlet,jsp -->
		<dependency>
			<groupId>javax.servlet</groupId>
			<artifactId>javax.servlet-api</artifactId>
		</dependency>
		<dependency>
			<groupId>javax.servlet</groupId>
			<artifactId>jstl</artifactId>
		</dependency>
		<!-- tomcat 的支持. -->
		<dependency>
			<groupId>org.springframework.boot</groupId>
			<artifactId>spring-boot-starter-tomcat</artifactId>
		</dependency>
		<dependency>
			<groupId>org.apache.tomcat.embed</groupId>
			<artifactId>tomcat-embed-jasper</artifactId>
			<scope>provided</scope>
		</dependency>
2.7.2配置视图解析器
#views
spring.mvc.view.prefix= /WEB-INF/views/
spring.mvc.view.suffix= .jsp
在main下面创建webapp/WEB-INF/views/
Controller实现
@Controller
public class JspController {

	@RequestMapping("/index")
	public String index(HttpServletResponse response,HttpServletRequest request ){

		request.setAttribute("msg", "这是springboot集成jsp");

		return "index";//访问的是视图解析器的jsp
//		return "forward:/index.jsp";//访问的是外部的jsp

	}
}
注意:如果是ide的话是编译不了jsp的,解决方案如下
<!--编译webapp下的jsp文件-->
       <resource>
           <directory>src/main/webapp</directory>
           <targetPath>META-INF/resources</targetPath>
           <includes>
               <include>**/*.*</include>
           </includes>
       </resource>
   </resources>
</build>
3.Mybatis整合springboot
3.1添加mybatis整合springboot的依赖包
<!-- Spring-Mybatis -->
		<dependency>
			<groupId>org.mybatis.spring.boot</groupId>
			<artifactId>mybatis-spring-boot-starter</artifactId>
			<version>1.3.0</version>
		</dependency>
		<!-- MySQL驱动 -->
		<dependency>
			<groupId>mysql</groupId>
			<artifactId>mysql-connector-java</artifactId>
		</dependency>
3.2配置数据源
#配置tomcat端口
server.port=8080
#访问路径
server.context-path=/
#DB config
spring.datasource.driverClassName=com.mysql.jdbc.Driver
spring.datasource.url=jdbc:mysql://localhost:3306/mybatis?useUnicode=true&characterEncoding=utf-8&useSSL=false
spring.datasource.username=root
spring.datasource.password=root
#配置加载xml文件,pojo
mybatis.type-aliases-package=cn.yanqi.pojo
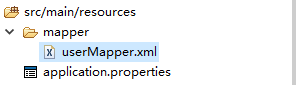
mybatis.mapperLocations=classpath:mapper/*.xml
在这里插入图片描述
3.3配置扫描包
/**
 * 指定所扫的包,会自动扫描指定包下的全部标有@Component的类,并注册成bean,
 * 当然包括@Component下的子注解@Service,@Repository,@Controller。
 * @author yanqi
 *
 */
@SpringBootApplication(scanBasePackages={"cn.yanqi.*"})
@MapperScan("cn.yanqi.mapper")//扫描mapper接口
public class DemoApplication {

	public static void main(String[] args) {
		SpringApplication.run(DemoApplication.class, args);
	}
}
3.4代码实现
3.4.1Pojo类
public class User implements Serializable{

	private static final long serialVersionUID = -5846970261372764303L;

	private Long id;

    // 用户名
    private String userName;

    // 密码
    private String password;

    // 姓名
    private String name;

    // 年龄
    private Integer age;

    // 性别,1男性,2女性
    private Integer sex;

    // 出生日期
    private Date birthday;

    // 创建时间
    private Date created;

    // 更新时间
    private Date updated;

    public Long getId() {
        return id;
    }

    public void setId(Long id) {
        this.id = id;
    }

    public String getUserName() {
        return userName;
    }

    public void setUserName(String userName) {
        this.userName = userName;
    }

    public String getPassword() {
        return password;
    }

    public void setPassword(String password) {
        this.password = password;
    }

    public String getName() {
        return name;
    }

    public void setName(String name) {
        this.name = name;
    }

    public Integer getAge() {
        return age;
    }

    public void setAge(Integer age) {
        this.age = age;
    }

    public Integer getSex() {
        return sex;
    }

    public void setSex(Integer sex) {
        this.sex = sex;
    }

    public Date getBirthday() {
        return birthday;
    }

    public void setBirthday(Date birthday) {
        this.birthday = birthday;
    }

    public Date getCreated() {
        return created;
    }

    public void setCreated(Date created) {
        this.created = created;
    }

    public Date getUpdated() {
        return updated;
    }

    public void setUpdated(Date updated) {
        this.updated = updated;
    }

    @Override
    public String toString() {
        return "User [id=" + id + ", userName=" + userName + ", password=" + password + ", name=" + name
                + ", age=" + age + ", sex=" + sex + ", birthday=" + birthday + ", created=" + created
                + ", updated=" + updated + "]";
    }

}
3.4.2Controller层
@RestController
public class UserController {
//注入service
@Autowired
private UserService userService;
/*
* 查询所有
* @GetMapping 里面包含了 @RequestMapping + method=RequestMethod.GET)
*/
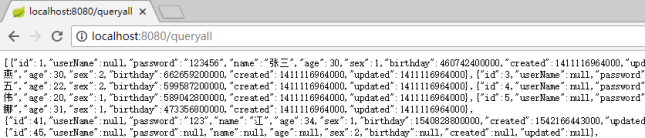
@GetMapping("/queryall")
//@RequestMapping(value="/queryall" ,method=RequestMethod.GET)
public List<User> queryUserAll(){
return this.userService.queryUserAll();
}
/*
* 根据id进行查询
*/
@GetMapping("/queryId")
public User queryById(Long id ) {
return this.userService.queryById(id);
}
}
3.4.3.Service层
@Service
public class UserService {

	@Autowired
	private UserMapper userMapper;

	public User queryById(Long id){
		return this.userMapper.queryById(id);
	}

	public List<User> queryUserAll() {
		return this.userMapper.ueryUserAll();
	}
}
3.4.4Mapper接口
@Mapper
public interface UserMapper {

	User queryById(Long id);

	public List<User> ueryUserAll();

	public int add(User user);

	public int update(@Param("id") Integer id, @Param("user") User user);

	public int delete(Integer id);
}
3.4.5 SqlMapper.xml
<?xml version="1.0" encoding="UTF-8"?>
<!DOCTYPE mapper PUBLIC "-//mybatis.org//DTD Mapper 3.0//EN" "http://mybatis.org/dtd/mybatis-3-mapper.dtd">
<mapper namespace="cn.yanqi.mapper.UserMapper">

	<!-- 根据id进行查询 -->
    <select id="queryById" resultType="User">
       select * from tb_user where id = #{id}
</select>

	<!-- 查询所有 -->
	<select id="ueryUserAll" resultType="User">
		select * from tb_user
	</select>

</mapper>
3.4.6页面
<script type="text/javascript" src="http://libs.baidu.com/jquery/2.0.0/jquery.min.js"></script>
</head>
<body>
<script type="text/javascript">
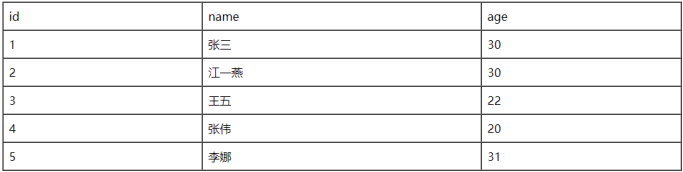
$.ajax({
type: "get",
url: "http://localhost:8080/queryall",
success: function(data){
var t = "";
$(data).each(function(i){
t += "<tr><td>" + data[i].id
+ "</td><td>"+ data[i].name
+ "</td><td>"+ data[i].age+"</td></tr>"
});
$("table").append(t);
}
});
</script>
<table align="center" border="1" cellpadding="8px" cellspacing="0px" width="70%">
<tr>
<td>id</td>
<td>name</td>
<td>age</td>
</tr>
</table>
3.4.7测试
http://localhost:8080/index.jsp
3.5日志
Spring Boot对各种日志框架都做了支持,我们可以通过配置来修改默认的日志的配置:
#设置日志级别
#print sql
logging.level.cn.yanqi=DEBUG
#print logging
logging.level.org.springframework=DEBUG
4.补充
4.1附件A
Spring Boot 应用启动器
spring Boot应用启动器具体如下:
1)spring-boot-starter 这是Spring Boot的核心启动器,包含了自动配置、日志和YAML。
2)spring-boot-starter-actuator 帮助监控和管理应用。
3)spring-boot-starter-amqp 通过spring-rabbit来支持AMQP协议(Advanced Message Queuing Protocol)。
4)spring-boot-starter-aop 支持面向方面的编程即AOP,包括spring-aop和AspectJ。
5)spring-boot-starter-artemis 通过Apache Artemis 支持 JMS的API(Java Message Service API)。
6)spring-boot-starter-batch 支持Spring Batch,包括HSQLDB数据库。
7)spring-boot-starter-cache 支持Spring的Cache抽象。
8)spring-boot-starter-cloud-connectors 支持Spring Cloud Connectors,简化了在像Cloud Foundry或Heroku这样的云平台上连接服务。
9)spring-boot-starter-data-elasticsearch 支持ElasticSearch搜索和分析引擎,包括spring-data-elasticsearch。
10)spring-boot-starter-data-gemfire 支持GemFire分布式数据存储,包括spring-data-gemfire。
11)spring-boot-starter-data-jpa 支持JPA(Java Persistence API),包括spring-data-jpa、spring-orm、hibernate。
12)spring-boot-starter-data-MongoDB 支持MongoDB数据,包括spring-data-mongodb。
13)spring-boot-starter-data-rest 通过spring-data-rest-webmvc,支持通过REST暴露Spring Data数据仓库。
14)spring-boot-starter-data-solr 支持Apache Solr搜索平台,包括spring-data-solr。
15)spring-boot-starter-freemarker 支持FreeMarker模板引擎。
16)spring-boot-starter-groovy-templates 支持Groovy模板引擎。
17)spring-boot-starter-hateoas 通过spring-hateoas支持基于HATEOAS的RESTful Web服务。
18)spring-boot-starter-hornetq 通过HornetQ支持 JMS。
19)spring-boot-starter-integration 支持通用的spring-integration模块。
20)spring-boot-starter-jdbc 支持JDBC数据库。
21)spring-boot-starter-jersey 支持Jersey RESTful Web 服务框架。
22)spring-boot-starter-jta-atomikos 通过Atomikos支持JTA分布式事务处理。
23)spring-boot-starter-jta-bitronix 通过Bitronix支持JTA分布式事务处理。
24)spring-boot-starter-mail 支持javax.mail模块。
25)spring-boot-starter-mobile 支持spring-mobile。
26)spring-boot-starter-mustache 支持Mustache模板引擎。
27)spring-boot-starter-Redis 支持Redis键值存储数据库,包括spring-redis。
28)spring-boot-starter-security 支持spring-security。
29)spring-boot-starter-social-facebook 支持spring-social-facebook
30)spring-boot-starter-social-linkedin 支持pring-social-linkedin
31)spring-boot-starter-social-twitter 支持pring-social-twitter
32)spring-boot-starter-test 支持常规的测试依赖,包括JUnit、Hamcrest、Mockito 以及 spring-test模块。
33)spring-boot-starter-thymeleaf 支持Thymeleaf模板引擎,包括与Spring的集成。
34)spring-boot-starter-velocity 支持Velocity模板引擎。
35)spring-boot-starter-web S支持全栈式Web开发,包括Tomcat和spring-webmvc。
36)spring-boot-starter-websocket 支持WebSocket开发。
37)spring-boot-starter-ws 支持Spring Web Services。
Spring Boot应用启动器面向生产环境的还有2种,具体如下:
1)spring-boot-starter-actuator 增加了面向产品上线相关的功能,比如测量和监控。
2)spring-boot-starter-remote-shell 增加了远程ssh shell的支持。
最后,Spring Boot应用启动器还有一些替换技术的启动器,具体如下:
1)spring-boot-starter-jetty 引入了Jetty HTTP引擎(用于替换Tomcat)。
2)spring-boot-starter-log4j 支持Log4J日志框架。
3)spring-boot-starter-logging 引入了Spring Boot默认的日志框架Logback。
4)spring-boot-starter-tomcat 引入了Spring Boot默认的HTTP引擎Tomcat。
5)spring-boot-starter-undertow 引入了Undertow HTTP 引擎(用于替换Tomcat)。
附录 B
Spring Boot 配置文件 application.properties
#########COMMON SPRING BOOT PROPERTIES
######CORE PROPERTIES===
#SPRING CONFIG (ConfigFileApplicationListener)
spring.config.name= # config file name (default to ‘application’)
spring.config.location= # location of config file
#PROFILES
spring.profiles= # comma list of active profiles
#APPLICATION SETTINGS (SpringApplication)
spring.main.sources=
spring.main.web-environment= # detect by default
spring.main.show-banner=true
spring.main…= # see class for all properties
#LOGGING
logging.path=/var/logs
logging.file=myapp.log
logging.config=
#IDENTITY (ContextIdApplicationContextInitializer)
spring.application.name=
spring.application.index=
#EMBEDDED SERVER CONFIGURATION (ServerProperties)
server.port=8080
server.address= # bind to a specific NIC
server.session-timeout= # session timeout in seconds
server.context-path= # the context path, defaults to ‘/’
server.servlet-path= # the servlet path, defaults to ‘/’
server.tomcat.access-log-pattern= # log pattern of the access log
server.tomcat.access-log-enabled=false # is access logging enabled
server.tomcat.protocol-header=x-forwarded-proto # ssl forward headers
server.tomcat.remote-ip-header=x-forwarded-for
server.tomcat.basedir=/tmp # base dir (usually not needed, defaults to tmp)
server.tomcat.background-processor-delay=30; # in seconds
server.tomcat.max-threads = 0 # number of threads in protocol handler
server.tomcat.uri-encoding = UTF-8 # character encoding to use for URL decoding
#SPRING MVC (HttpMapperProperties)
http.mappers.json-pretty-print=false # pretty print JSON
http.mappers.json-sort-keys=false # sort keys
spring.mvc.locale= # set fixed locale, e.g. enUK
spring.mvc.date-format= # set fixed date format, e.g. dd/MM/yyyy
spring.mvc.message-codes-resolver-format= # PREFIXERRORCODE / POSTFIXERROR_CODE
spring.view.prefix= # MVC view prefix
spring.view.suffix= # … and suffix
spring.resources.cache-period= # cache timeouts in headers sent to browser
spring.resources.add-mappings=true # if default mappings should be added
#THYMELEAF (ThymeleafAutoConfiguration)
spring.thymeleaf.prefix=classpath:/templates/
spring.thymeleaf.suffix=.html
spring.thymeleaf.mode=HTML5
spring.thymeleaf.encoding=UTF-8
spring.thymeleaf.content-type=text/html # ;charset= is added
spring.thymeleaf.cache=true # set to false for hot refresh
#FREEMARKER (FreeMarkerAutoConfiguration)
spring.freemarker.allowRequestOverride=false
spring.freemarker.allowSessionOverride=false
spring.freemarker.cache=true
spring.freemarker.checkTemplateLocation=true
spring.freemarker.contentType=text/html
spring.freemarker.exposeRequestAttributes=false
spring.freemarker.exposeSessionAttributes=false
spring.freemarker.exposeSpringMacroHelpers=false
spring.freemarker.prefix=
spring.freemarker.requestContextAttribute=
spring.freemarker.settings.*=
spring.freemarker.suffix=.ftl
spring.freemarker.templateEncoding=UTF-8
spring.freemarker.templateLoaderPath=classpath:/templates/
spring.freemarker.viewNames= # whitelist of view names that can be resolved
#GROOVY TEMPLATES (GroovyTemplateAutoConfiguration)
spring.groovy.template.allowRequestOverride=false
spring.groovy.template.allowSessionOverride=false
spring.groovy.template.cache=true
spring.groovy.template.configuration.*= # See Groovy’s TemplateConfiguration
spring.groovy.template.contentType=text/html
spring.groovy.template.prefix=classpath:/templates/
spring.groovy.template.suffix=.tpl
spring.groovy.template.templateEncoding=UTF-8
spring.groovy.template.viewNames= # whitelist of view names that can be resolved
#VELOCITY TEMPLATES (VelocityAutoConfiguration)
spring.velocity.allowRequestOverride=false
spring.velocity.allowSessionOverride=false
spring.velocity.cache=true
spring.velocity.checkTemplateLocation=true
spring.velocity.contentType=text/html
spring.velocity.dateToolAttribute=
spring.velocity.exposeRequestAttributes=false
spring.velocity.exposeSessionAttributes=false
spring.velocity.exposeSpringMacroHelpers=false
spring.velocity.numberToolAttribute=
spring.velocity.prefix=
spring.velocity.properties.*=
spring.velocity.requestContextAttribute=
spring.velocity.resourceLoaderPath=classpath:/templates/
spring.velocity.suffix=.vm
spring.velocity.templateEncoding=UTF-8
spring.velocity.viewNames= # whitelist of view names that can be resolved
#INTERNATIONALIZATION (MessageSourceAutoConfiguration)
spring.messages.basename=messages
spring.messages.cacheSeconds=-1
spring.messages.encoding=UTF-8
#SECURITY (SecurityProperties)
security.user.name=user # login username
security.user.password= # login password
security.user.role=USER # role assigned to the user
security.require-ssl=false # advanced settings …
security.enable-csrf=false
security.basic.enabled=true
security.basic.realm=Spring
security.basic.path= # /**
security.headers.xss=false
security.headers.cache=false
security.headers.frame=false
security.headers.contentType=false
security.headers.hsts=all # none / domain / all
security.sessions=stateless # always / never / if_required / stateless
security.ignored=false
#DATASOURCE (DataSourceAutoConfiguration & DataSourceProperties)
spring.datasource.name= # name of the data source
spring.datasource.initialize=true # populate using data.sql
spring.datasource.schema= # a schema (DDL) script resource reference
spring.datasource.data= # a data (DML) script resource reference
spring.datasource.platform= # the platform to use in the schema resource (schema-${platform}.sql)
spring.datasource.continueOnError=false # continue even if can’t be initialized
spring.datasource.separator=; # statement separator in SQL initialization scripts
spring.datasource.driverClassName= # JDBC Settings…
spring.datasource.url=
spring.datasource.username=
spring.datasource.password=
spring.datasource.max-active=100 # Advanced configuration…
spring.datasource.max-idle=8
spring.datasource.min-idle=8
spring.datasource.initial-size=10
spring.datasource.validation-query=
spring.datasource.test-on-borrow=false
spring.datasource.test-on-return=false
spring.datasource.test-while-idle=
spring.datasource.time-between-eviction-runs-millis=
spring.datasource.min-evictable-idle-time-millis=
spring.datasource.max-wait-millis=
#MONGODB (MongoProperties)
spring.data.mongodb.host= # the db host
spring.data.mongodb.port=27017 # the connection port (defaults to 27107)
spring.data.mongodb.uri=mongodb://localhost/test # connection URL
spring.data.mongo.repositories.enabled=true # if spring data repository support is enabled
#JPA (JpaBaseConfiguration, HibernateJpaAutoConfiguration)
spring.jpa.properties.*= # properties to set on the JPA connection
spring.jpa.openInView=true
spring.jpa.show-sql=true
spring.jpa.database-platform=
spring.jpa.database=
spring.jpa.generate-ddl=false # ignored by Hibernate, might be useful for other vendors
spring.jpa.hibernate.naming-strategy= # naming classname
spring.jpa.hibernate.ddl-auto= # defaults to create-drop for embedded dbs
spring.data.jpa.repositories.enabled=true # if spring data repository support is enabled
#SOLR (SolrProperties})
spring.data.solr.host=http://127.0.0.1:8983/solr
spring.data.solr.zkHost=
spring.data.solr.repositories.enabled=true # if spring data repository support is enabled
#ELASTICSEARCH (ElasticsearchProperties})
spring.data.elasticsearch.cluster-name= # The cluster name (defaults to elasticsearch)
spring.data.elasticsearch.cluster-nodes= # The address(es) of the server node (comma-separated;
if not specified starts a client node)
spring.data.elasticsearch.local=true # if local mode should be used with client nodes
spring.data.elasticsearch.repositories.enabled=true # if spring data repository support is
enabled
#FLYWAY (FlywayProperties)
flyway.locations=classpath:db/migrations # locations of migrations scripts
flyway.schemas= # schemas to update
flyway.initVersion= 1 # version to start migration
flyway.prefix=V
flyway.suffix=.sql
flyway.enabled=true
flyway.url= # JDBC url if you want Flyway to create its own DataSource
flyway.user= # JDBC username if you want Flyway to create its own DataSource
flyway.password= # JDBC password if you want Flyway to create its own DataSource
#LIQUIBASE (LiquibaseProperties)
liquibase.change-log=classpath:/db/changelog/db.changelog-master.yaml
liquibase.contexts= # runtime contexts to use
liquibase.default-schema= # default database schema to use
liquibase.drop-first=false
liquibase.enabled=true
#JMX
spring.jmx.enabled=true # Expose MBeans from Spring
#ABBIT (RabbitProperties)
spring.rabbitmq.host= # connection host
spring.rabbitmq.port= # connection port
spring.rabbitmq.addresses= # connection addresses (e.g. myhost:9999,otherhost:1111)
spring.rabbitmq.username= # login user
spring.rabbitmq.password= # login password
spring.rabbitmq.virtualhost=
spring.rabbitmq.dynamic=
#REDIS (RedisProperties)
spring.redis.host=localhost # server host
spring.redis.password= # server password
spring.redis.port=6379 # connection port
spring.redis.pool.max-idle=8 # pool settings …
spring.redis.pool.min-idle=0
spring.redis.pool.max-active=8
spring.redis.pool.max-wait=-1
#ACTIVEMQ (ActiveMQProperties)
spring.activemq.broker-url=tcp://localhost:61616 # connection URL
spring.activemq.user=
spring.activemq.password=
spring.activemq.in-memory=true # broker kind to create if no broker-url is specified
spring.activemq.pooled=false
#HornetQ (HornetQProperties)
spring.hornetq.mode= # connection mode (native, embedded)
spring.hornetq.host=localhost # hornetQ host (native mode)
spring.hornetq.port=5445 # hornetQ port (native mode)
spring.hornetq.embedded.enabled=true # if the embedded server is enabled (needs
hornetq-jms-server.jar)
spring.hornetq.embedded.serverId= # auto-generated id of the embedded server (integer)
spring.hornetq.embedded.persistent=false # message persistence
spring.hornetq.embedded.data-directory= # location of data content (when persistence is enabled)
spring.hornetq.embedded.queues= # comma separate queues to create on startup
spring.hornetq.embedded.topics= # comma separate topics to create on startup
spring.hornetq.embedded.cluster-password= # customer password (randomly generated by default)
#JMS (JmsProperties)
spring.jms.pub-sub-domain= # false for queue (default), true for topic
#SPRING BATCH (BatchDatabaseInitializer)
spring.batch.job.names=job1,job2
spring.batch.job.enabled=true
spring.batch.initializer.enabled=true
spring.batch.schema= # batch schema to load
#AOP
spring.aop.auto=
spring.aop.proxy-target-class=
#FILE ENCODING (FileEncodingApplicationListener)
spring.mandatory-file-encoding=false
#SPRING SOCIAL (SocialWebAutoConfiguration)
spring.social.auto-connection-views=true # Set to true for default connection views or false if
you provide your own
#SPRING SOCIAL FACEBOOK (FacebookAutoConfiguration)
spring.social.facebook.app-id= # your application’s Facebook App ID
spring.social.facebook.app-secret= # your application’s Facebook App Secret
#SPRING SOCIAL LINKEDIN (LinkedInAutoConfiguration)
spring.social.linkedin.app-id= # your application’s LinkedIn App ID
spring.social.linkedin.app-secret= # your application’s LinkedIn App Secret
#SPRING SOCIAL TWITTER (TwitterAutoConfiguration)
spring.social.twitter.app-id= # your application’s Twitter App ID
spring.social.twitter.app-secret= # your application’s Twitter App Secret
#SPRING MOBILE SITE PREFERENCE (SitePreferenceAutoConfiguration)
spring.mobile.sitepreference.enabled=true # enabled by default
#SPRING MOBILE DEVICE VIEWS (DeviceDelegatingViewResolverAutoConfiguration)
spring.mobile.devicedelegatingviewresolver.enabled=true # disabled by default
spring.mobile.devicedelegatingviewresolver.normalPrefix=
spring.mobile.devicedelegatingviewresolver.normalSuffix=
spring.mobile.devicedelegatingviewresolver.mobilePrefix=mobile/
spring.mobile.devicedelegatingviewresolver.mobileSuffix=
spring.mobile.devicedelegatingviewresolver.tabletPrefix=tablet/
spring.mobile.devicedelegatingviewresolver.tabletSuffix=
######ACTUATOR PROPERTIES===
#MANAGEMENT HTTP SERVER (ManagementServerProperties)
management.port= # defaults to ‘server.port’
management.address= # bind to a specific NIC
management.contextPath= # default to ‘/’
#ENDPOINTS (AbstractEndpoint subclasses)
endpoints.autoconfig.id=autoconfig
endpoints.autoconfig.sensitive=true
endpoints.autoconfig.enabled=true
endpoints.beans.id=beans
endpoints.beans.sensitive=true
endpoints.beans.enabled=true
endpoints.configprops.id=configprops
endpoints.configprops.sensitive=true
endpoints.configprops.enabled=true
endpoints.configprops.keys-to-sanitize=password,secret
endpoints.dump.id=dump
endpoints.dump.sensitive=true
endpoints.dump.enabled=true
endpoints.env.id=env
endpoints.env.sensitive=true
endpoints.env.enabled=true
endpoints.health.id=health
endpoints.health.sensitive=false
endpoints.health.enabled=true
endpoints.info.id=info
endpoints.info.sensitive=false
endpoints.info.enabled=true
endpoints.metrics.id=metrics
endpoints.metrics.sensitive=true
endpoints.metrics.enabled=true
endpoints.shutdown.id=shutdown
endpoints.shutdown.sensitive=true
endpoints.shutdown.enabled=false
endpoints.trace.id=trace
endpoints.trace.sensitive=true
endpoints.trace.enabled=true
#MVC ONLY ENDPOINTS
endpoints.jolokia.path=jolokia
endpoints.jolokia.sensitive=true
endpoints.jolokia.enabled=true # when using Jolokia
endpoints.error.path=/error
#JMX ENDPOINT (EndpointMBeanExportProperties)
endpoints.jmx.enabled=true
endpoints.jmx.domain= # the JMX domain, defaults to ‘org.springboot’
endpoints.jmx.unique-names=false
endpoints.jmx.enabled=true
endpoints.jmx.staticNames=
#JOLOKIA (JolokiaProperties)
jolokia.config.*= # See Jolokia manual
#REMOTE SHELL
shell.auth=simple # jaas, key, simple, spring
shell.command-refresh-interval=-1
shell.command-path-pattern= # classpath:/commands/, classpath:/crash/commands/
shell.config-path-patterns= # classpath:/crash/
shell.disabled-plugins=false # don’t expose plugins
shell.ssh.enabled= # ssh settings …
shell.ssh.keyPath=
shell.ssh.port=
shell.telnet.enabled= # telnet settings …
shell.telnet.port=
shell.auth.jaas.domain= # authentication settings …
shell.auth.key.path=
shell.auth.simple.user.name=
shell.auth.simple.user.password=
shell.auth.spring.roles=
#GIT INFO
spring.git.properties= # resource ref to generated git info properties file


 5415
5415


 被折叠的 条评论
为什么被折叠?
被折叠的 条评论
为什么被折叠?
 到【灌水乐园】发言


