官方文档:
Highly Available (Mirrored) Queues (翻译)
一、普通集群模式(默认)
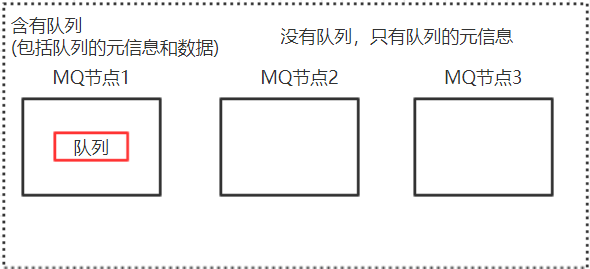
默认情况下,RabbitMQ集群中队列的内容仅位于单个节点上(即声明该队列的节点,也就是主节点)。创建队列时,只会在某一个节点上创建队列,其它节点上并不含有队列,而只是含有创建节点的元数据(包括队列信息,绑定关系等)。如果队列所在的节点故障,则队列就崩溃了。
如何配置
Rabbitmq集群的搭建步骤
假设node1为主节点,node2和node3为镜像节点
1.配置各个节点的hosts文件,让各节点都能相互识别对方
192.168.0.2 node1
192.168.0.3 node2
192.168.0.4 node3
2.编辑RabbitMQ的cookie文件,以确保各个节点的cookie文件使用的是同一个值。
cookie相当于秘钥令牌,集群中的节点需要通过交换秘钥令牌以获得相互认证。cookie文件默认路径为/var/lib/rabbitmq/.erlang.cookie或$HOME/.erlang.cookie。可以直接将node1主节点上的cookie拷贝到其它节点。
3.配置集群
通过rabbitmqctl工具配置
①首先启动三个节点
rabbitmq-server -detached
可以通过rabbitmqctl cluster_status命令来查看各个节点的状态

②将3个节点组成集群
我们将node1节点作为主节点,将node2和node3加入node1节点的集群中。
分别在node2和node3上操作:
    rabbitmq stop_app
    rabbitmqctl reset
    rabbitmqctl join_cluster rabbit@node1
    rabbitmqctl start_app
    这样,node1和node2就处于同一个集群中了,在这两个节点上都执行rabbitmqctl cluster_status命令可以看到相同的输出。
    (  如果要移除节点则使用rabbitmqctl forget_cluster_node rabbit@node2(具体节点)   )
③为集群设置一个名称
集群的名称默认与master节点名称相同。
rabbitmqctl set_cluster_name rabbitmq_cluster
二、镜像队列模式
官方文档:Highly Available (Mirrored) Queues
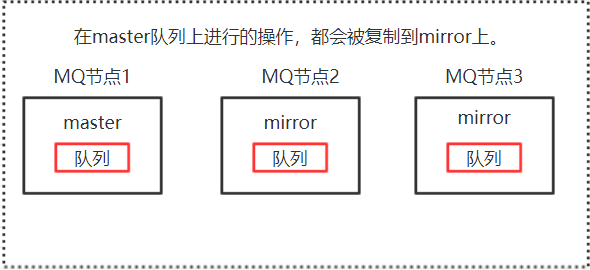
RabbitMQ还为我们提供了镜像队列,用来实现RabbitMQ的高可用HA。RabbitMQ集群由一个主节点和一/多个镜像节点组成。官方用主节点(master)和镜像节点(mirror)来表示。而由于历史原因,RabbitMQ CLI工具会使用slave来表示镜像节点。
下面从官网摘抄了部分镜像队列的重要特点:
①All operations for a given queue are first applied on the queue's master node and then propagated to mirrors.
对队列上的所有操作都是先应用到主节点上,再传播到镜像节点上。这包含了排队发布消息,传递消息给消费者,跟踪消费者的确认等。队列镜像意味着节点集群,因此,不建议在广域网中使用它。
②Messages published to the queue are replicated to all mirrors. Consumers are connected to the master regardless of which node they connect to, with mirrors dropping messages that have been acknowledged at the master. Queue mirroring therefore enhances availability, but does not distribute load across nodes (all participating nodes each do all the work).
发布到队列的消息将复制到所有镜像。消费者连接到主服务器,无论他们连接到哪个节点,镜像都会丢弃已在主服务器上确认的消息。(也就是说,在master上确认过了,就不再复制,提升性能)
③All actions other than publishes go only to the master, and the master then broadcasts the effect of the actions to the mirrors. Thus clients consuming from a mirrored queue are in fact consuming from the master.
除发布消息外的所有其他操作都只交给master,然后master将操作产生的结果广播到镜像。因此,从镜像队列中消费的客户端实际上是从master中消费的。
④If the node that hosts queue master fails, the oldest mirror will be promoted to the new master as long as it synchronised. Unsynchronised mirrors can be promoted, too, depending on queue mirroring parameters.
如果master节点发生故障,则最老的镜像将在同步后提升为新的主服务器。也可以根据队列镜像参数,升级不同步的镜像。
复制因子
官方文档:Replication Factor: How Many Mirrors are Optimal?
如果将队列镜像到所有节点上是很保守的。在大多数情况下,不需要在每个节点上都有副本,所以建议这样处理:对于3个节点的集群,复制到2个节点,对于5个节点的集群,复制到3个节点。
故障转移
官方文档:Mirrored Queue Implementation and Semantics
Should a mirror fail, there is little to be done other than some bookkeeping: the master remains the master and no client need take any action or be informed of the failure. Note that mirror failures may not be detected immediately and the interruption of the per-connection flow control mechanism can delay message publication.
如果mirror节点故障,除了做一些记录外,什么都不做:master仍然是master,客户端不需要采取任何行动,或者被通知mirror失效。
如果master节点故障,选举一个mirror节点成为新的master:
①通常将最老的镜像提升为master,因为最老的镜像与前任master之间的同步状态应该是最好的
②将所有已发送给客户端且等待确认的所有消息重新入队。这可以为客户端的确认提供信息:确认是在到大master的网络上丢失,还是在从master广播到mirror时丢失。
③……
④……
⑤……
⑥……
镜像集群的缺点
镜像集群模式中消息实体会主动在镜像节点间同步,而不是在客户端取数据时临时拉取。该模式带来的副作用也很明显,除了降低系统性能外,如果镜像队列数量过多(前面已经提到过并不需要所有节点都参与复制),加之大量的消息进入,集群内部的网络带宽将会被这种同步通讯大大消耗掉。
如何配置
官方文档:
镜像模式是基于普通集群模式的,配置非常简单。只需要在前面普通集群模式的基础上,再配置一个policy即可。我们继续在前面步骤之上操作,可以通过命令或者rabbitmq管理界面两种方式来操作:
①通过命令来配置
#linux
rabbitmqctl set_policy rabbitmq_cluster "^node." '{"ha-mode":"all"}'
#windows
rabbitmqctl set_policy rabbitmq_cluster "^node." "{""ha-mode"":""all""}"
更多的配置可以参考官方的案例:Examples
#1.配置匹配的队列,将被镜像到集群中的任意两个节点
(上面linux,下面windows)
rabbitmqctl set_policy ha-two "^two."
  '{"ha-mode":"exactly","ha-params":2,"ha-sync-mode":"automatic"}'

rabbitmqctl set_policy ha-two "^two." ^
   "{""ha-mode"":""exactly"",""ha-params"":2,"ha-sync-mode":"automatic"}"


#2.配置匹配的队列,将被镜像到集群中的所有节点
# ha-all为集群名,名称以ha开头的队列将会被镜像都集群中的所有节点上
(上面linux,下面windows)
rabbitmqctl set_policy ha-all "^ha." '{"ha-mode":"all"}'

rabbitmqctl set_policy ha-all "^ha." "{""ha-mode"":""all""}"


#3.配置匹配的队列,将被镜像到集群中的指定节点
(上面linux,下面windows)
rabbitmqctl set_policy ha-nodes "^nodes."
'{"ha-mode":"nodes","ha-params":["rabbit@nodeA", "rabbit@nodeB"]}'

rabbitmqctl set_policy ha-nodes "^nodes." ^
"{""ha-mode"":""nodes"",""ha-params"":[""rabbit@nodeA"", ""rabbit@nodeB""]}"
ha-mode:指明镜像队列的模式,有效值为all、exactly、nodes,默认为all。
- all:表示在集群中的所有节点上进行镜像。
- exactly:表示在指定个数的节点上进行镜像,节点个数由ha-params指定。
- nodes:表示在指定节点上进行镜像,节点名称通过ha-parames指定,节点的名称通常类似于rabbit@host,可以通过rabbitmqctl cluster_status命令查看到。
ha-params:不同的ha-mode配置中需要用到的参数。
ha-sync-mode:队列中消息的同步方式,有效值为automatic和manual。
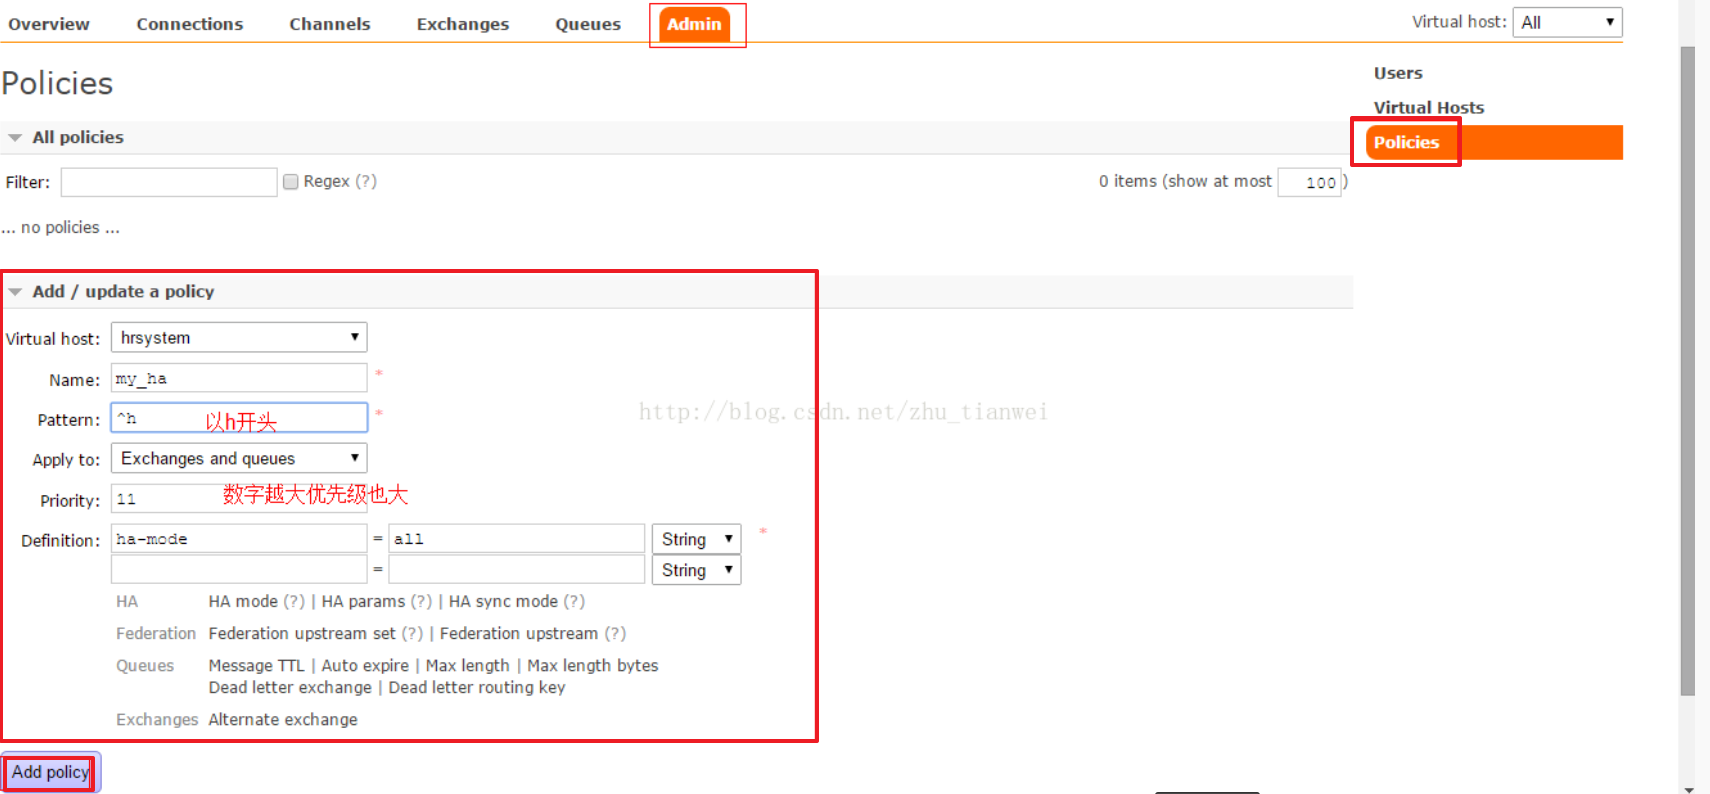
②通过rabbitmq管理界面来配置
下面仅仅是配置界面示意图,并非正确的配置。
节点类型
RabbitMQ节点分为内存节点和磁盘节点:
1)内存节点(RAM):内存节点将所有的队列、交换机、绑定、用户、权限和vhost的元数据定义存储在内存中
2)磁盘节点(Disk):将元数据存储在磁盘中。单节点系统只允许磁盘类型的节点,防止重启RabbitMQ的时候,丢失系统的配置信息。
如果在投递消息时,打开了消息的持久化,那么即使是内存节点,数据还是安全的放在磁盘。
良好的设计架构可以如下:
一个集群里有3台以上机器,其中1台使用磁盘模式,其它使用内存模式。内存模式的节点,无疑速度更快,因此客户端(consumer、producer)连接访问它们。而磁盘模式的节点,由于磁盘IO相对较慢,因此仅作数据备份使用。
三、分布式部署
官方文档:Distributed RabbitMQ
RabbitMQ集群对延迟非常敏感,应该只在本地局域网中使用。在广域网中不应该使用集群模式,而应该使用Federation或者Shovel来进行分布式部署。
Shovel(远程模式)
官方文档:Shovel
这种模式配置比较复杂,属于RabbitMQ比较早期的模型了,现在很少使用了。
Federation
官方文档:Federation
这是实现异地数据复制的主流模式,现在实现异地集群的一般都是采用这种双活 或者 多活模型。